
High-Precision Stopping with Wall Markers (Kachaka Pro)
High-precision stopping with wall markers is a Kachaka Pro-only feature. You stick a dedicated marker on the wall directly above a destination, and as Kachaka approaches while carrying furniture it reads the marker and stops at a fixed position with greater precision than usual. It is ideal wherever the robot must always stop exactly on the mark, such as a fixed docking point or an under-counter storage slot.
It only works when carrying furniture. The Kachaka base traveling on its own does not reference wall markers. The wall-marker setting takes effect only when Kachaka is moving to a destination with furniture loaded.
For creating a destination and setting its position and heading, see Adding, Repositioning and Setting Default Destinations. For general stopping accuracy, see Stop Position Accuracy.
Step 1: Print and stick the marker
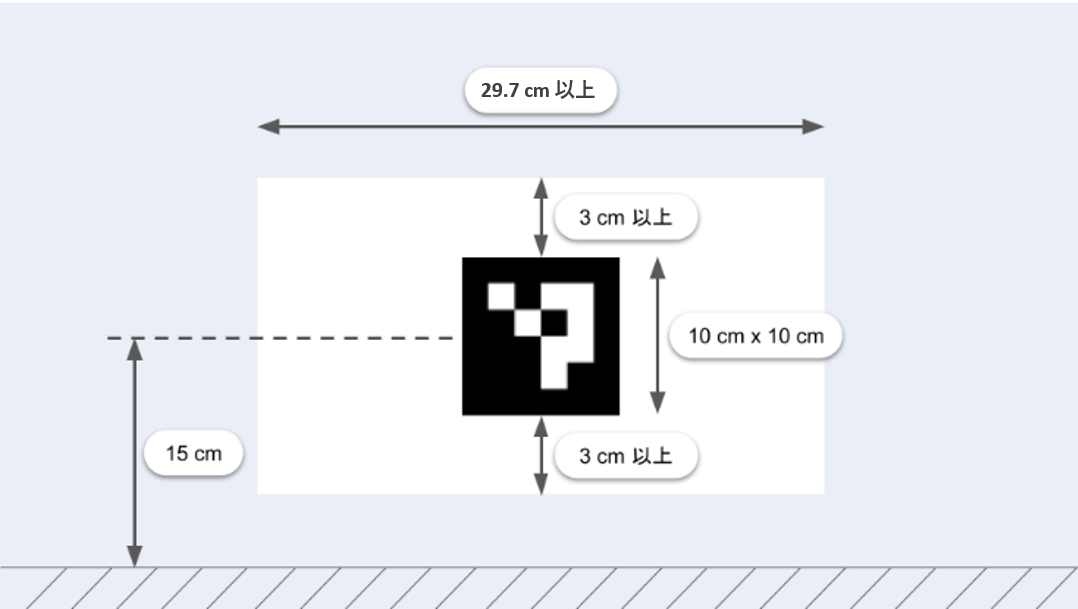
- Get the dedicated wall-marker file (with a white background) and print it on A4 paper. If you use the PDF, set the print scale to 100%.
- After printing, measure it with a ruler — the marker must be 10 cm × 10 cm. A noticeably wrong size will make Kachaka unable to read the marker, causing the move to fail or stopping accuracy to degrade.
- Stick the marker on the wall directly above the spot where you want Kachaka to stop, at an appropriate height from the floor. If you printed on A4, you may trim the excess white margin at the top as long as the marker area below stays intact.
When sticking the marker, make sure to:
- Stick it on a vertical wall, with the top edge of the marker level with the floor.
- Keep the paper flat — no wrinkles, no skew, no bulging. If the marker is not flat, Kachaka may weave as it backs in or stop off-position.
- If there is no wall at the spot, set up a sturdy board to act as a wall and stick the marker to it.
Step 2: Configure in the App
-
Create a destination at the spot where you stuck the marker. Note on heading: if you set the destination heading to the opposite direction, Kachaka’s front-to-back stopping orientation will flip accordingly.
-
Open the “Map” tab in the App and select this destination where you want high-precision stopping.
-
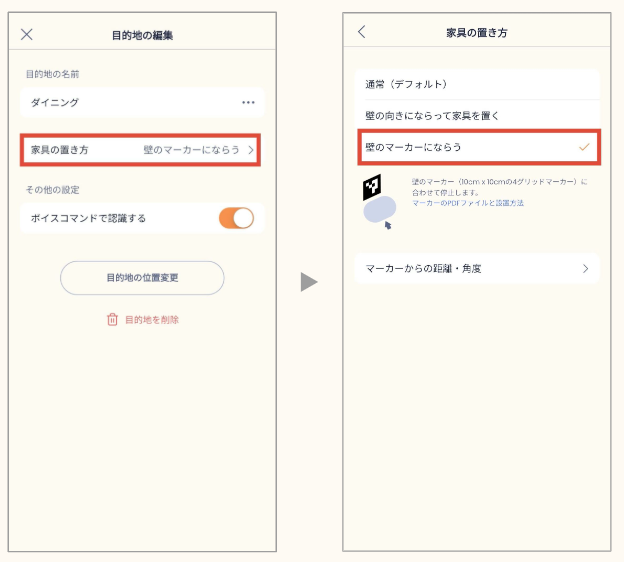
Tap “Edit destination,” then tap the “Furniture placement” item.
-
Under placement, select “Follow wall marker.”
-
Send Kachaka to this destination carrying furniture and confirm it stops accurately directly below the marker. If needed, adjust the “distance/angle from marker” setting to fine-tune the stopping position.
Placement and environment conditions (check these if the marker isn’t read)
Installation environment
- Kachaka must be able to recognize the spot as a wall. Stick the marker where the sensor can detect the wall; a warped marker will fail recognition.
- If there is no wall, set up a sturdy board instead. If behavior is unstable, extend the board to the left and right so Kachaka recognizes it as a wall more easily. Board recommendations:
- OK: acrylic, PVC, or wood — any white-ish material with stable reflectance (material doesn’t matter).
- Not OK: hollow corrugated plastic (PP board) and other materials prone to warping and deforming.
- The marker location must be recognized as a wall on the map. If you use an added board, make sure it was scanned when the map was created. If the map already exists, use Updating an Existing Map (Kachaka Pro) to add the board to the map.
- Make sure there are no bumps or protrusions near the marker that create sensor blind spots.
The marker itself
- Size: 10 cm × 10 cm (the required size). Measure it with a ruler after printing.
- Material: a low-glare matte, durable material is recommended.
- Print quality: no distortion or bulging.
- Lighting: use in a low-glare environment so external light from lighting and the like doesn’t cause detection failure.
Screens

Related
- Updating an Existing Map (Kachaka Pro)
- Adding, Repositioning and Setting Default Destinations
- Stop Position Accuracy
- Moving Furniture: Basics
To obtain the wall-marker file or for further help, please contact Sigma.