Creating a Map with 3D Data
A standard map only records the floor plane, so the points where chair and table legs touch the ground still count as part of the white, walkable area; Kachaka only dodges them on the spot using its sensors when it arrives. When you build the map with 3D data included, three-dimensional objects such as chairs and tables are treated as non-walkable during mapping and are excluded from the map’s white travel area right away.
This is especially useful in spaces packed with tables and chairs (a restaurant floor, an exam room, an open office, for example). Previously you had to manually draw a no-go zone under every table; a map with 3D data saves you that step.
Setup Steps
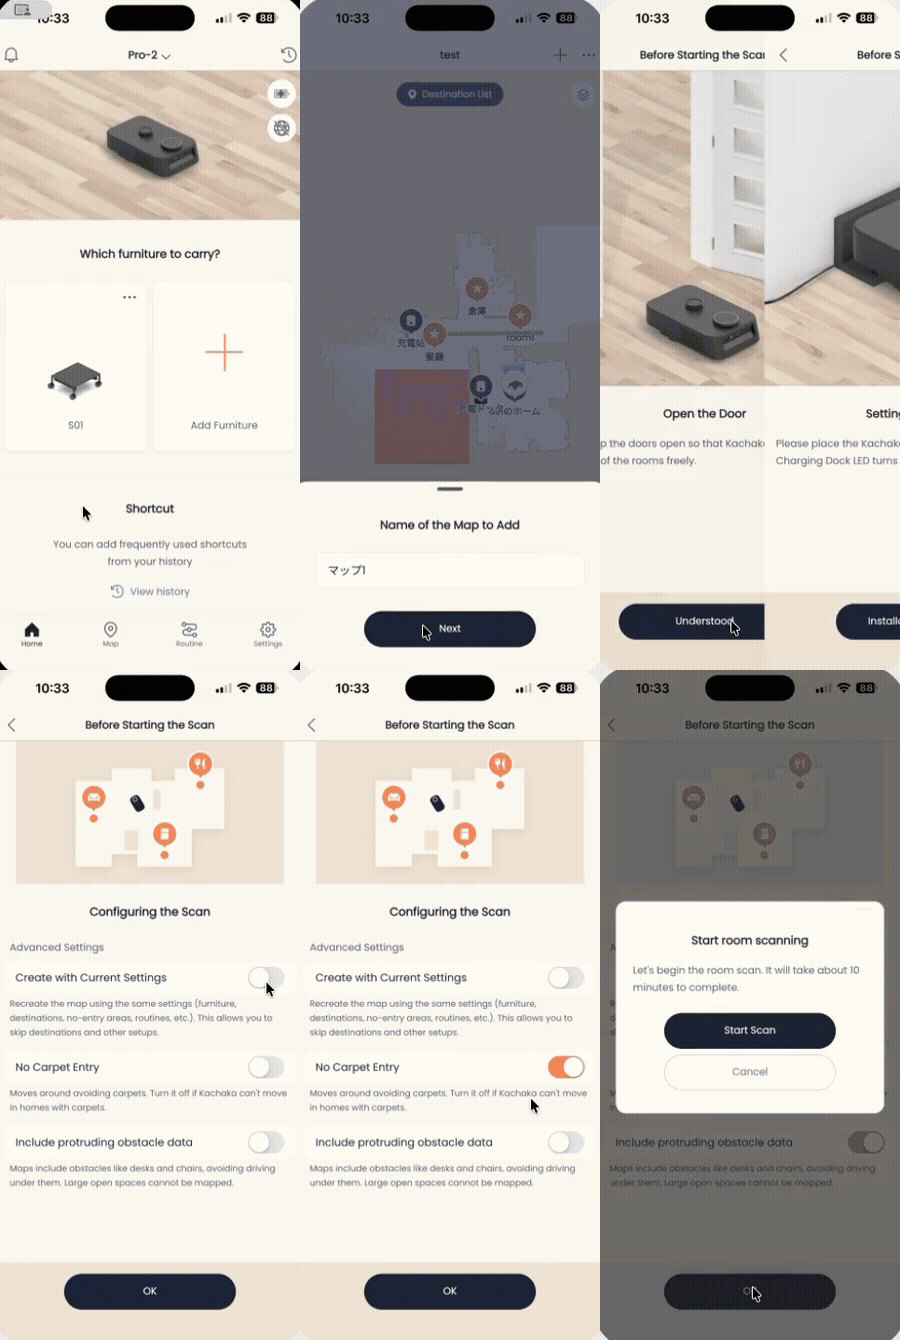
First make sure the area is ready for mapping (clear the floor, good lighting, and the other prep details in Map Prep and Accuracy Tips), then follow these steps:
- Tap the “Map” tab in the app.
- Tap the ”+” in the top-right corner.
- Tap “Add Map”.
- Choose “Create New” or “Create with current settings” (the latter keeps your furniture, destinations, and schedules and only rebuilds the map).
- Follow the on-screen prompts until you reach the “Before You Start Scanning” screen.
- Turn the “Include 3D data” toggle ON, then tap “OK”.
- Follow the on-screen guidance to finish the rest of the mapping run.
The overall mapping flow is the same as a regular map — see Creating a New Map — the only difference is the toggle in step 6.
Toggling the 3D Data Display
Once the map is built, you can switch the 3D data display on or off at any time:
- Tap the “Map” tab.
- Tap the icon in the top-right corner of the screen.
- Toggle “Include 3D data” at the bottom of the screen to show or hide the markings for three-dimensional obstacles.
When to Use It and Its Limits
- For spaces with lots of three-dimensional obstacles such as table legs and shelf feet, turning this on is recommended — it greatly reduces the work of manually drawing no-go zones afterward.
- A map with 3D data still detects obstacles in real time; the 3D data is a snapshot of the environment at mapping time. If tables and chairs are later moved significantly, re-map or update the map.
- This option is chosen only when creating a new map. To add 3D data to an existing map, follow whatever options the app presents at the time.
Screens