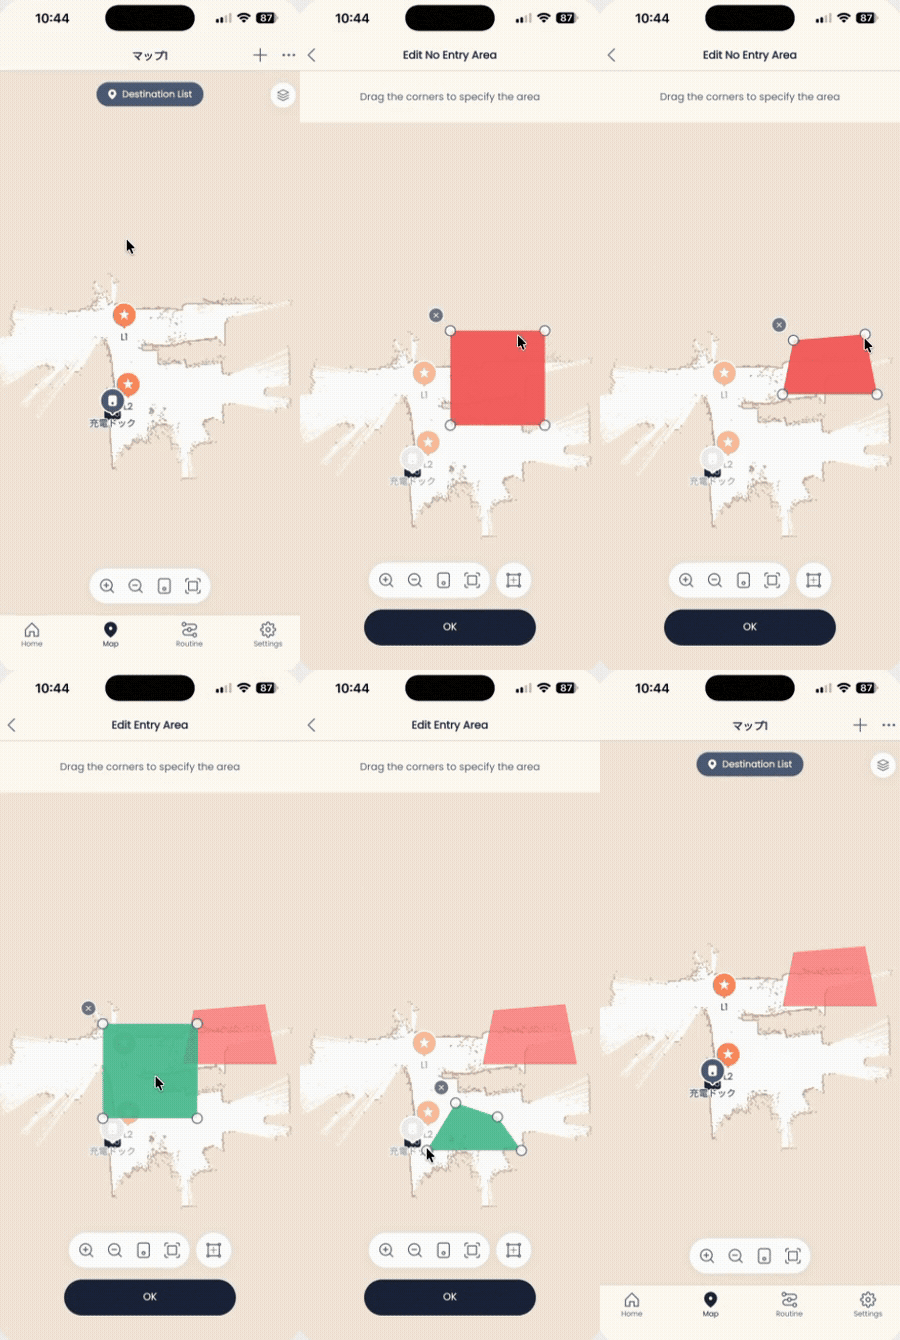
No-Go Zones and Enterable Areas
Drawing zones on the map lets you precisely control where Kachaka / Kachaka Pro will and won’t go. This page covers two complementary settings: marking places you don’t want the robot to pass through as “no-go zones,” and marking places that were mistaken for obstacles (but are actually clear) as “enterable areas.” Both are configured on the map in the app.
No-Go Zones: Keep Kachaka Out
When there’s a spot you don’t want Kachaka to drive through, or something nearby you don’t want it to bump into (fragile items, a pet’s food bowl, a stairwell, or a drop-off), set it as a no-go zone. Once set, Kachaka routes around the area when planning its path. You can set multiple no-go zones on a single map.
To set one up:
- Open the app and tap the “Map” tab.
- Tap the ”+” in the top right.
- Choose “Set No-Go Zone.”
- Drag a pink frame on the map to enclose the area you want to block.
- The frame’s shape is fully adjustable, so resize and reshape it to fit the spot.
Tip: No-go zones are also commonly used to stop Kachaka from falling off an edge or drop-off. If your space has a stairwell or platform edge, enclose it with a no-go zone as well.
Enterable Areas: Clear Areas Wrongly Flagged as Obstacles
The layout at the moment you create a map gets baked into it. If a piece of furniture happened to be sitting there or a door was closed during mapping, then once the furniture is moved or the door is opened, that spot is still recorded as an impassable obstacle on the map—so Kachaka avoids it or gets stuck. Set it as an “enterable area” and Kachaka can pass through normally.
Enterable areas have a second use: once set, floor-obstacle detection is disabled within that area. If a pattern, discoloration, or reflection on the floor is mistaken for an obstacle by the camera and Kachaka stops where there’s nothing in the way, enclosing that patch of floor as an enterable area resolves it.
To set one up:
- Open the app and tap the “Map” tab.
- Tap the ”+” in the top right.
- Choose “Set Enterable Area.”
- Drag a green frame on the map to enclose the area you want to clear.
- The frame’s shape is fully adjustable; size it to match the actual space.
Caution: Don’t Enclose Real Walls
When setting an enterable area, keep clear of actual walls. If you enclose a real wall inside the green frame, Kachaka will assume it can drive there and try to pass through it, causing collisions or getting stuck.
- Bad practice: the green frame crosses or covers a real wall.
- Good practice: the green frame covers only floor that is genuinely clear and traversable, kept inside the wall line.
If you want to fully resolve issues like chair legs and table legs being treated as obstacles, you can instead create a map with 3D data, so these objects don’t occupy the traversable area from the mapping stage on. For more on false stops caused by floor patterns, see Collisions, Obstacle Detection and Floor-Pattern Stops and Safety Detection.
What to Do If Kachaka Enters a No-Go Zone
If you’ve set a no-go zone but Kachaka still drives into it, it’s usually one of two causes.
1. First, Confirm the No-Go Zone Is Set Correctly
- Open the map from the home tab.
- Check that the pink frame actually encloses the area you want to block.
- To edit it, tap the ”…” in the top right of the screen.
- Choose “Set No-Go Zone.”
- Tap the pink frame to adjust its size or shape.
2. Then, Confirm Kachaka Isn’t Drifting
If the frame is drawn correctly and it still enters, the robot has most likely mistaken its own position on the map—it “thinks” it’s somewhere else and steps into the real no-go zone.
- Compare Kachaka’s marked position on the map with where it actually is, and see whether the two differ.
- If there’s drift, say “Nee Kachaka, ochitsuite” (the wake word followed by “calm down”) and Kachaka will recalibrate its self-position.
If the drift keeps recurring and Kachaka gets lost often, recalibration alone won’t fix it—see Fixing Position Drift and Getting Lost. For spaces where the layout has changed long-term, create a new map for a clean slate.
Screens