Map Prep and Accuracy Tips
Kachaka builds its map by scanning automatically, but the quality of that map directly determines how reliably it drives afterwards. A poorly built map leads to problems where the on-map position no longer matches reality and the robot gets lost. Following the steps below before and during mapping (whether you are creating a new map or rebuilding one) greatly reduces these issues.
Prepare the environment before mapping
Before you start scanning, get the space into a state the robot can see clearly.
- Check for drop-offs to prevent falls. Kachaka has drop-off detection, but it can still fall at entryway steps or stairs. Do not map near such hazards, and after scanning consider fencing them off with a no-go zone.
- Clear the floor. Remove clutter that could snag the robot along its driving area. Furniture you never move, trash cans, and chairs you move in normal use can stay as they are.
- Open the doors so Kachaka can move between rooms. Keep doors closed where you do not want it to go, or that lead to steps or stairs. See mapping in environments with doors for details.
- Close curtains over floor-to-ceiling windows. Closing the curtains lets the area near the window map more cleanly.
- Keep the space well lit. Areas being auto-scanned need enough light; dim lighting hurts recognition.
How to behave during mapping
While scanning is in progress, the movement of people and objects directly affects map quality.
- Add a landmark in long corridors. In long hallways and other repetitive scenery, place a pole or other distinctive object as a feature to help the robot localize.
- Do not walk in front of the robot. Stay directly behind Kachaka or stand still while mapping. Walking ahead of it risks being recorded into the map as an obstacle.
- Minimize surrounding movement. Pause foot traffic and the moving of objects as much as possible to avoid scanning in things that should not be there. If a phantom obstacle does get scanned, see removing phantom obstacles on the map.
- Keep doors on the route open while mapping if there is a door along the driving path.
Your driving pattern decides accuracy
How and where you drive is the key to map accuracy.
- Make a loop roughly every 20 m. After driving about 20 m, circle back to the same spot to form a loop, which helps correct accumulated error.
- Drive both directions. Do not travel a path one way only; cover it there and back.
- Drive multiple paths to fill blanks. For areas still shown white (unscanned), have Kachaka pass through from various points.
- Drive paths you want it to use, both ways. If there is a passage you specifically want Kachaka to take, drive it back and forth.
- Return to the dock before saving. When finishing, try to bring the robot back to its charging dock before performing the save.
If a long corridor keeps drifting, try moving in a loop by taking another route in addition to the corridor itself — this usually improves things.
Drop scan pins to fill in the map
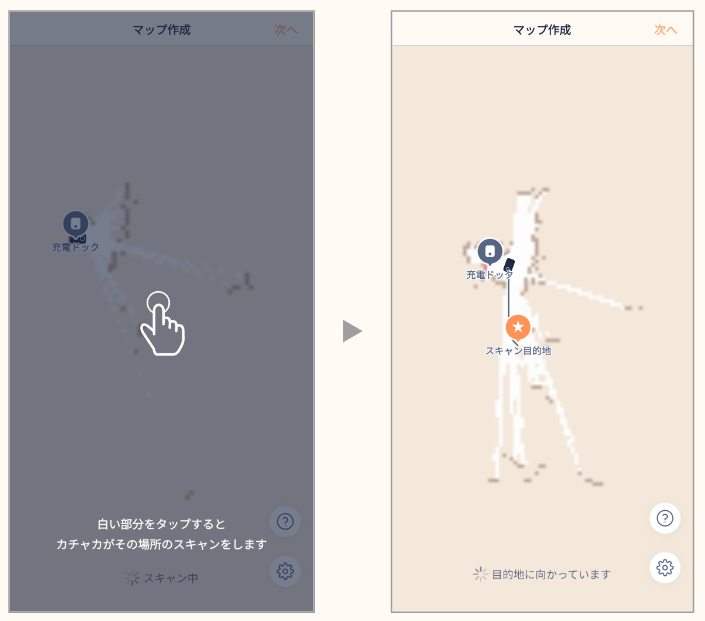
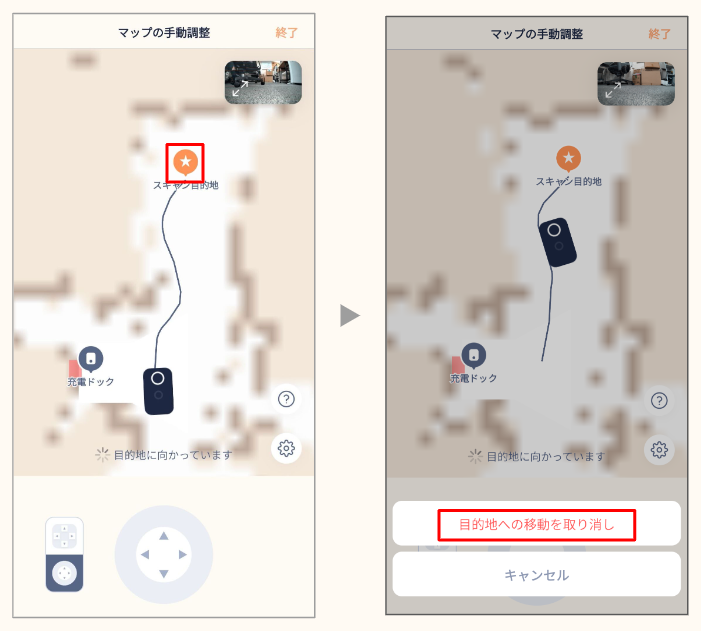
Manually driving the robot far away, or fine-controlling it with the stick, is awkward for many people. To solve this, during mapping you can simply tap a point on the App map and have Kachaka drive there itself and scan along the way — saving you from steering cell by cell.
- During auto-scan: Tap a spot in the white (already-built) area to drop a “scan destination” pin, and Kachaka drives toward it, scanning as it goes.
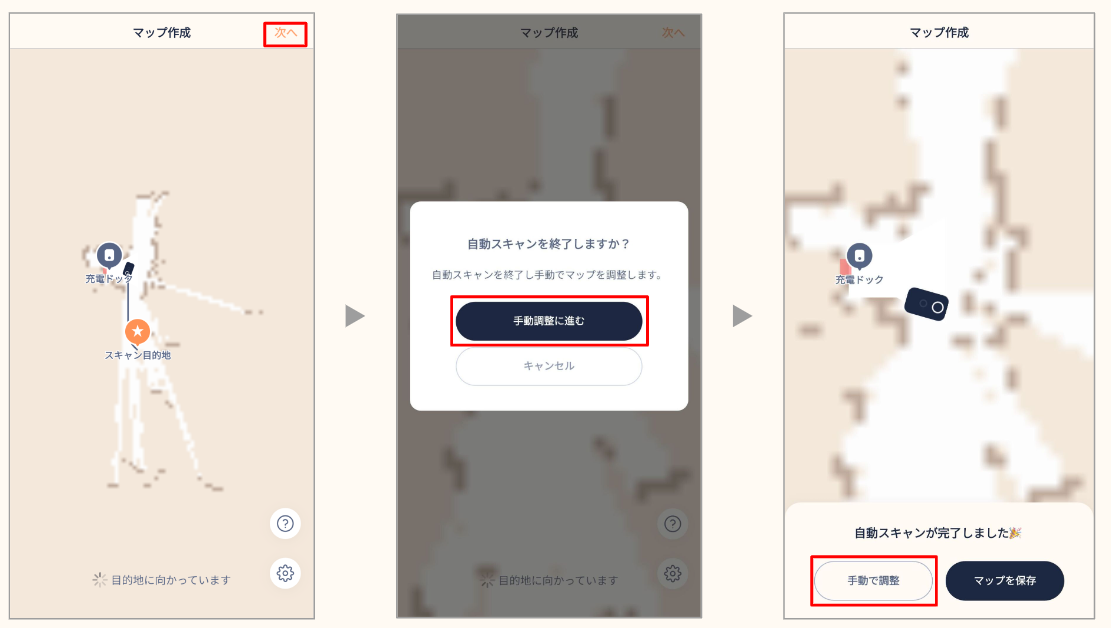
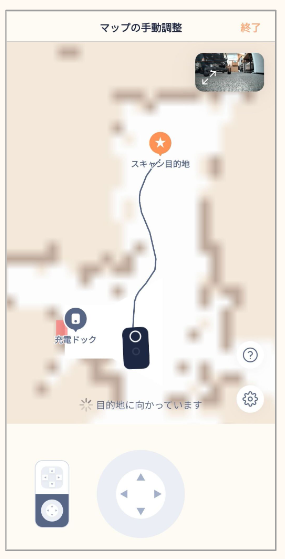
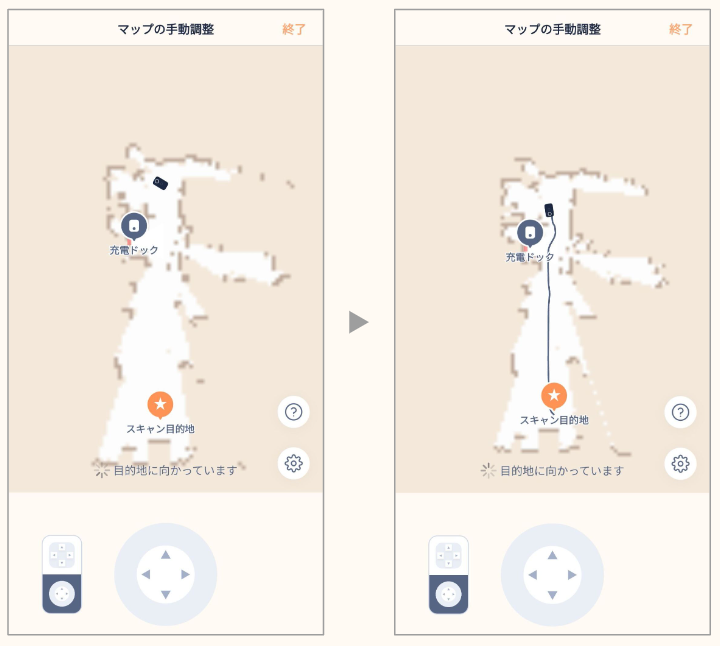
- Works in manual scan too: On the auto-scan screen, tap Next, then Proceed to manual adjustment, then Manual adjustment to enter the manual scan screen. Tapping a white area there likewise drops a pin for the robot to head to.
- Watch the route. If no black line (the route) appears after dropping the pin, Kachaka is still planning the path. If no route shows for more than 10 seconds, or the pin disappears on its own, it has judged the point hard to reach — tap a spot closer to the robot instead. Rather than somewhere far off, drop the pin about 2–3 m ahead.
- Cancel the move. To stop heading to a scan destination, tap the pin and tap Cancel moving to destination.
If the auto-scan leaves corners unfilled, you can patch them afterward under Manual adjustment to complete the whole space. To go further and stop chairs and table legs from being treated as drivable area, consider creating a map with 3D data.
Screens