Kachaka API: Overview and How to Enable
The Kachaka API (Application Programming Interface) lets you control Kachaka programmatically and connect it to your own systems and external services. Both the home Kachaka and the commercial Kachaka Pro support it.
What the Kachaka API can do
With the API you can:
- Issue commands such as carrying furniture, moving to a destination, or returning to the dock from code, instead of tapping through the app every time
- Read the robot’s live status (position, battery, task progress, and more) and feed it into your own dashboard or scheduling system
- Connect to external services, sensors, or button devices to build automation flows tailored to your site
For advanced flows like repeated round trips or chained multi-stop deliveries, you can orchestrate them through the API instead of the app’s queue and routines — see Queue and Repeated or Multiple Tasks. Picking up furniture can likewise be triggered via the API; see Loading and Picking Up Furniture.
Docs, community, and sample code
The manufacturer hosts the API docs, discussion community, and sample code together on GitHub:
- Official docs and sample repository: https://github.com/pf-robotics/kachaka-api — how to run the API, setup instructions, and sample downloads are all here
- User community (Discussions): https://github.com/pf-robotics/kachaka-api/discussions — exchange tips, ask questions, and share approaches with other developers
- Sample code: JupyterLab, Python, and ROS2 samples are provided to help you get started quickly. The samples are updated over time; see the GitHub docs above for how to obtain them
Prerequisite: check your robot’s version
The Kachaka API requires robot software Ver 2.0.8 or later. Check your version before enabling, and update to the latest version if needed — see Updating the Robot’s Software (Manual, Automatic, and Notifications) for how to check and update.
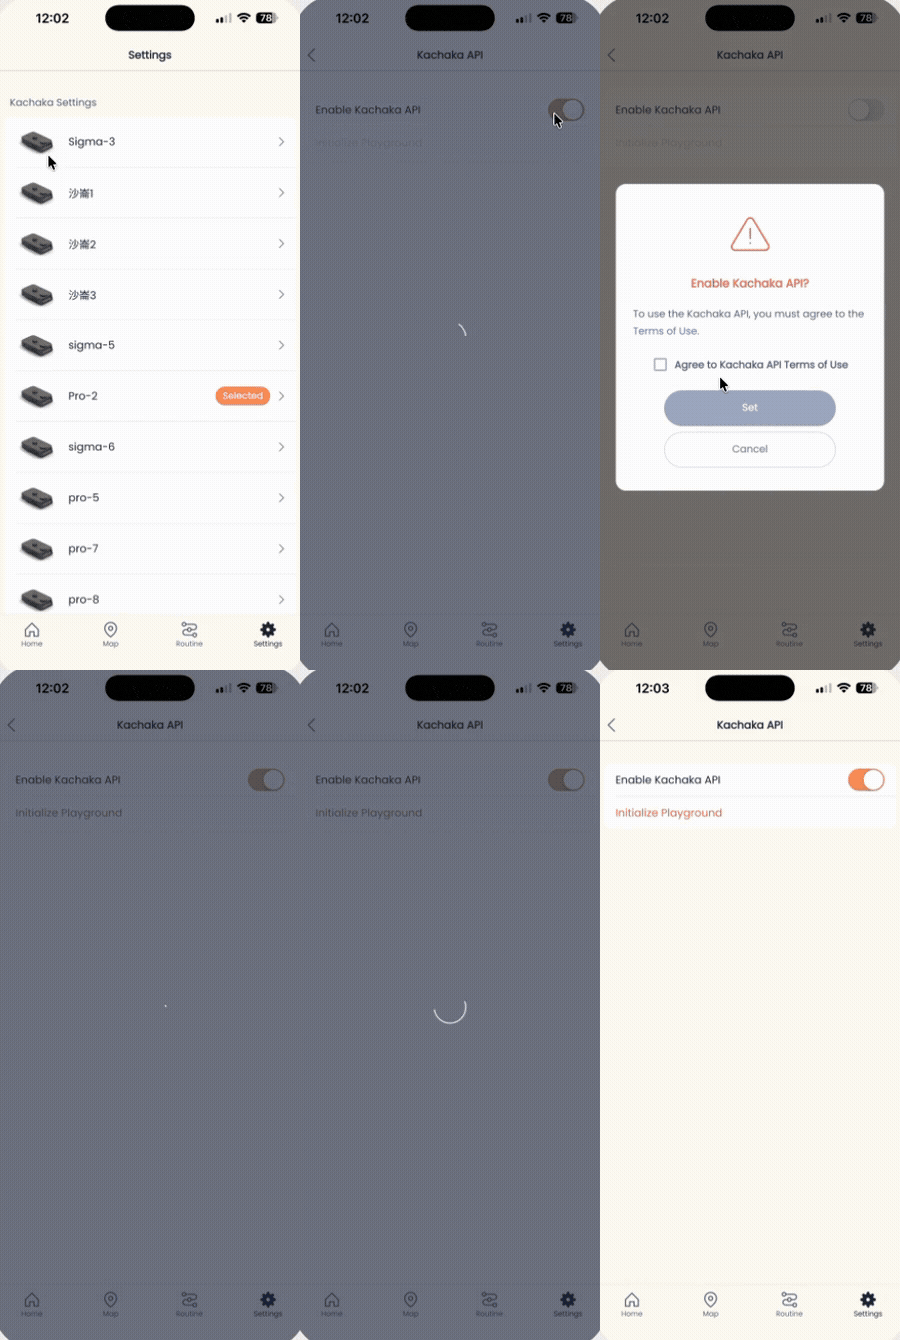
Enabling the Kachaka API in the app
Once the version is confirmed, enable the API in the app as follows (advanced Button Hub use also requires this setting to be turned on first):
- Open the Kachaka app and go to the “Settings” tab.
- Under “Kachaka Settings”, tap the Kachaka you want to enable.
- Tap “Kachaka API” in the middle of the screen.
- Turn the “Enable Kachaka API” toggle to ON.
- In the dialog that appears, review the API terms of use and check “I agree to the Kachaka API terms of use”.
- Tap “Set”.
- When the screen shows “Kachaka API enabled”, setup is complete.
After enabling, you can connect to the robot per the GitHub docs and start developing. Connecting requires the robot’s IP address — see Finding and Fixing IP / MAC Addresses for how to look it up and fix it.
The exact contents and scope of the API terms of use follow Sigma Taiwan’s announcements.
Screens