Setting Driving Routes (Kachaka Pro)
By default, Kachaka plans its own path, avoiding obstacles and taking the shortest route. But in long corridors, busy walkways, or anywhere you need predictable traffic flow, you may want it to follow a route you define rather than always taking the shortest path. This feature is available on Kachaka Pro only.
This page covers the two ways to pin a route — Driving Lines and Point-to-Point Routes — plus the obstacle bypass setting that both share.
Note: Trips shorter than 1 m do not follow a driving route; Kachaka uses a free path instead.
Driving Lines: Keep Kachaka on a Line
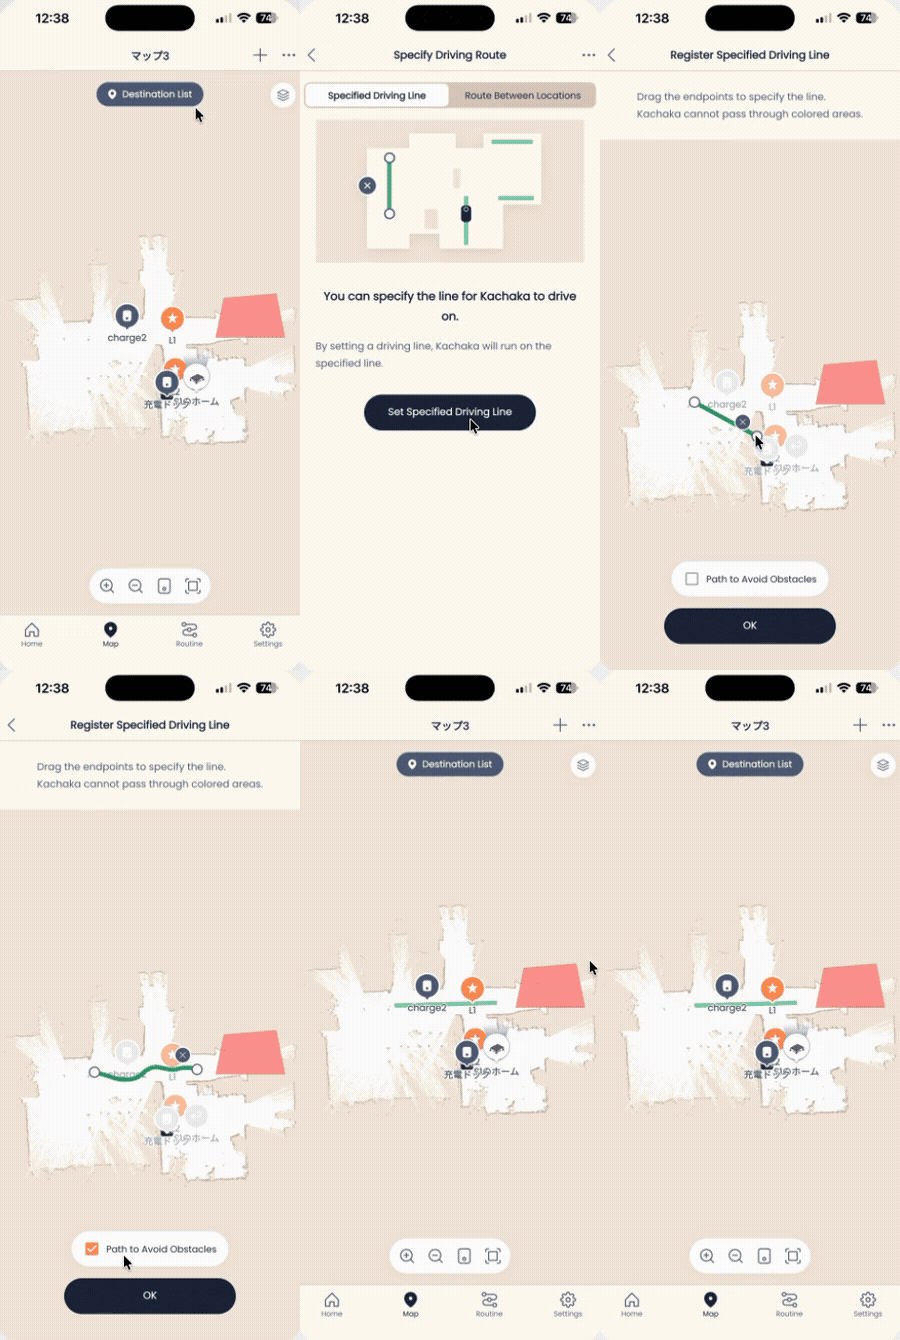
When you draw a Driving Line on the map, Kachaka follows it whenever it travels nearby. This is useful for:
- Keeping Kachaka on one side of a long corridor.
- Applying a path across many trips at once, without specifying each point-to-point route individually — just draw the line.
Steps
- Open the Map tab in the app.
- Tap the ”+” icon in the top-right corner.
- Tap “Set driving route” in the menu.
- Switch to the “Driving Line” tab.
- Tap “Set driving line”.
- A green line appears. Drag the “O” handles at each end to position the start and end points.
- To follow a path that avoids obstacles instead of a straight line, check “Drive around obstacles”.
- When done, tap “OK”.
- To add another line, tap the ”+” icon on screen and repeat step 6.
- Tap “Register” to close the editor, then confirm the line appears on the map.
Point-to-Point Routes: A Set Path Between Two Destinations
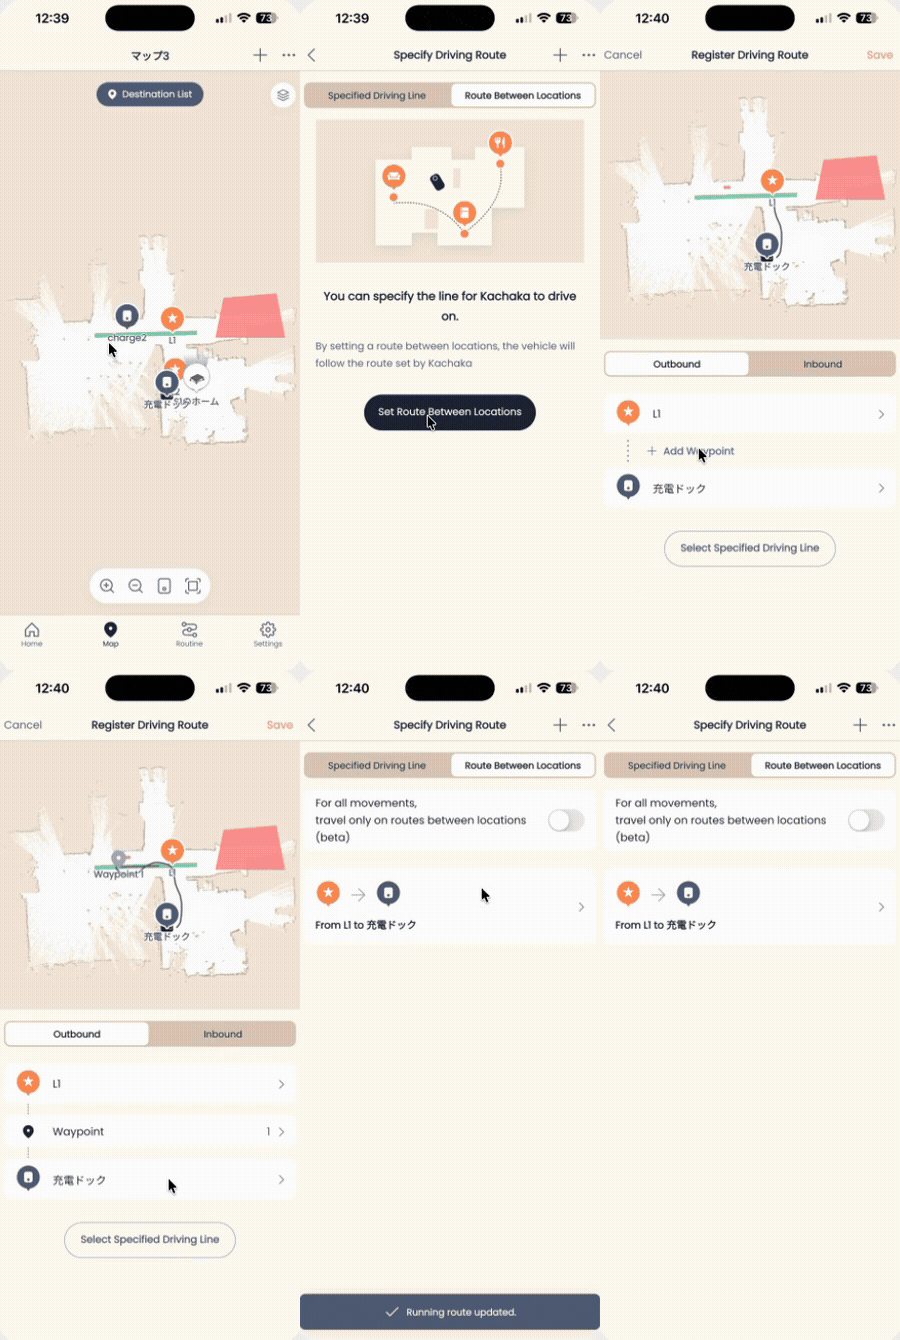
If you only want to fix the path for one specific leg, use a Point-to-Point Route. You add via-points between two destinations so Kachaka passes through them in the order you set, instead of taking the shortest path. Before you start, make sure your destination positions are finalized — see Adding, Repositioning and Setting Default Destinations.
Steps
- Open the Map tab.
- Tap the ”+” icon in the top-right corner.
- Tap “Set driving route” in the menu.
- Switch to the “Point-to-Point Route” tab.
- Tap “Set point-to-point route”.
- Select the destination pin to start from, then tap “Start here >”.
- Select the destination pin to arrive at, then tap “Deliver here >”.
- Tap ”+ Add via-point” to insert points to pass through between the two destinations.
- Tap the spot you want it to pass through, then tap “OK here >”.
- To add more, tap “Via-point” again. In the editor you can: add via-points, switch the via type (straight or curved), edit each point’s position, reorder points, and delete points. When finished, tap “OK” in the top-right.
- Finally, confirm two options, then tap “Save” in the top-right:
- Whether to check “Apply to the reverse route too” (use the same path on the way back).
- Under “Driving line setting”, whether this route should also follow your driving lines.
To set up another leg right away, tap the start or arrival field in the middle of the screen and reselect the destinations.
Older Software (v3.5.1 and earlier)
If your robot software is v3.5.1 or earlier, the flow is slightly different: in the Map tab tap ”+” -> “Set driving route”, select the 2 destinations for the route at once, tap ”…” in the top-right -> “Edit”, then use ”+ Add via-point”, drag “Via-point 1” into place, and keep adding via-points to fine-tune the path. Tap “Save” in the top-right when done.
Caution: In the older flow, if you change a destination’s position after setting the route, all of that route’s via-points are cleared. Always finalize destination positions first, then set the driving route. To check your version, see Checking Your App and Robot Software Versions.
Shared Setting: Obstacle Bypass
This setting applies to both Driving Lines and Point-to-Point Routes.
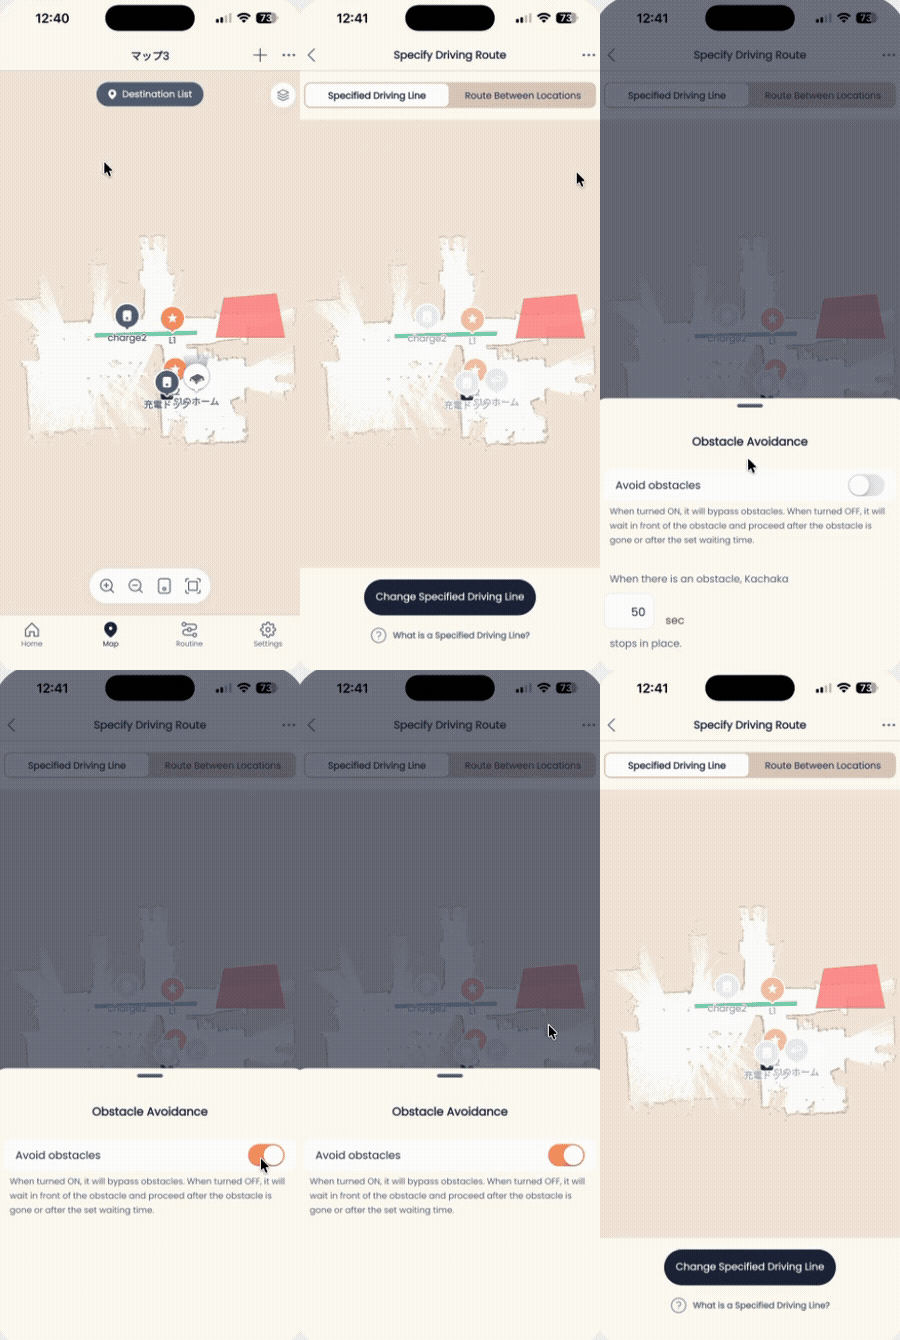
On software v3.8.5 and later you can toggle “Drive around obstacles” on or off (versions v3.7.7 and earlier always bypass):
- Open the Map tab.
- Tap the ”+” icon in the top-right corner.
- Tap “Set driving route” in the menu.
- Tap the ”…” icon in the top-right corner.
- Tap “Obstacle bypass”.
- Toggle “Drive around obstacles”:
- On: Kachaka drives around obstacles on the route and continues.
- Off: Kachaka stops at an obstacle on the route, then follows two rules — (1) bypass after a set time elapses, and (2) resume once the obstacle is gone.
Regardless of this setting, Kachaka always stops if a person is directly in front of it.
Pairing With Other Pro Settings
Driving routes work well alongside these Pro features:
- To slow down in specific areas, pair with Setting Speed Zones (Kachaka Pro).
- To block areas entirely, pair with No-Go Zones and Enterable Areas.
- If a route crosses a slope, also see Setting Slope Zones (Kachaka Pro).
Screens