Setting Slope Zones (Kachaka Pro)
This feature is for Kachaka Pro only. The standard Kachaka does not support slope zones.
When a route includes a ramp or a barrier-free slope, you can mark that stretch as a “slope zone” on the map. Once Kachaka Pro enters a slope zone, it automatically locks the wheels (engages the brake) and adjusts the laser sensor’s detection range, so the robot climbs and descends more smoothly without slipping or misreading the incline as an obstacle.
Before You Start
Slopes carry a risk of cargo and the robot itself sliding, so read these points first:
- Cargo may slide off. While traveling on an incline, items on the shelf or base can shift and fall. Secure whatever you carry.
- Do not park furniture on an incline. Furniture left on a slope can slide away on its own. Avoid setting a furniture storage position (Home) or a destination on a slope, and do not run the “place furniture here” action on a ramp.
- Pause mode releases the wheel brake. If you press the power button once inside a slope zone to enter pause mode (yellow LED), the wheel brake is released. If you must pause on a slope, support the robot and shelf by hand first to keep them from sliding before you do anything.
A slope zone only flags the incline so the robot can recognize it. The function that actually holds the robot in place on a slope and stops it from sliding when parked is “brake when stopped.” For the full picture of how Pro travels on gentle slopes and how the parking brake works, see Kachaka Pro: Gentle Slope Travel & Brake When Stopped.
Step 1: Enable “Brake When Stopped” and Drive Over the Slope While Mapping
When you build a map that includes a slope, first enable “brake when stopped” on the mapping screen and actually drive the robot over the slope, so the map captures the incline data correctly.
- Open the mapping screen.
- Tap the gear icon and turn “brake when stopped” on.
- Drive the robot over the incline you intend to mark as a slope, and finish the map.
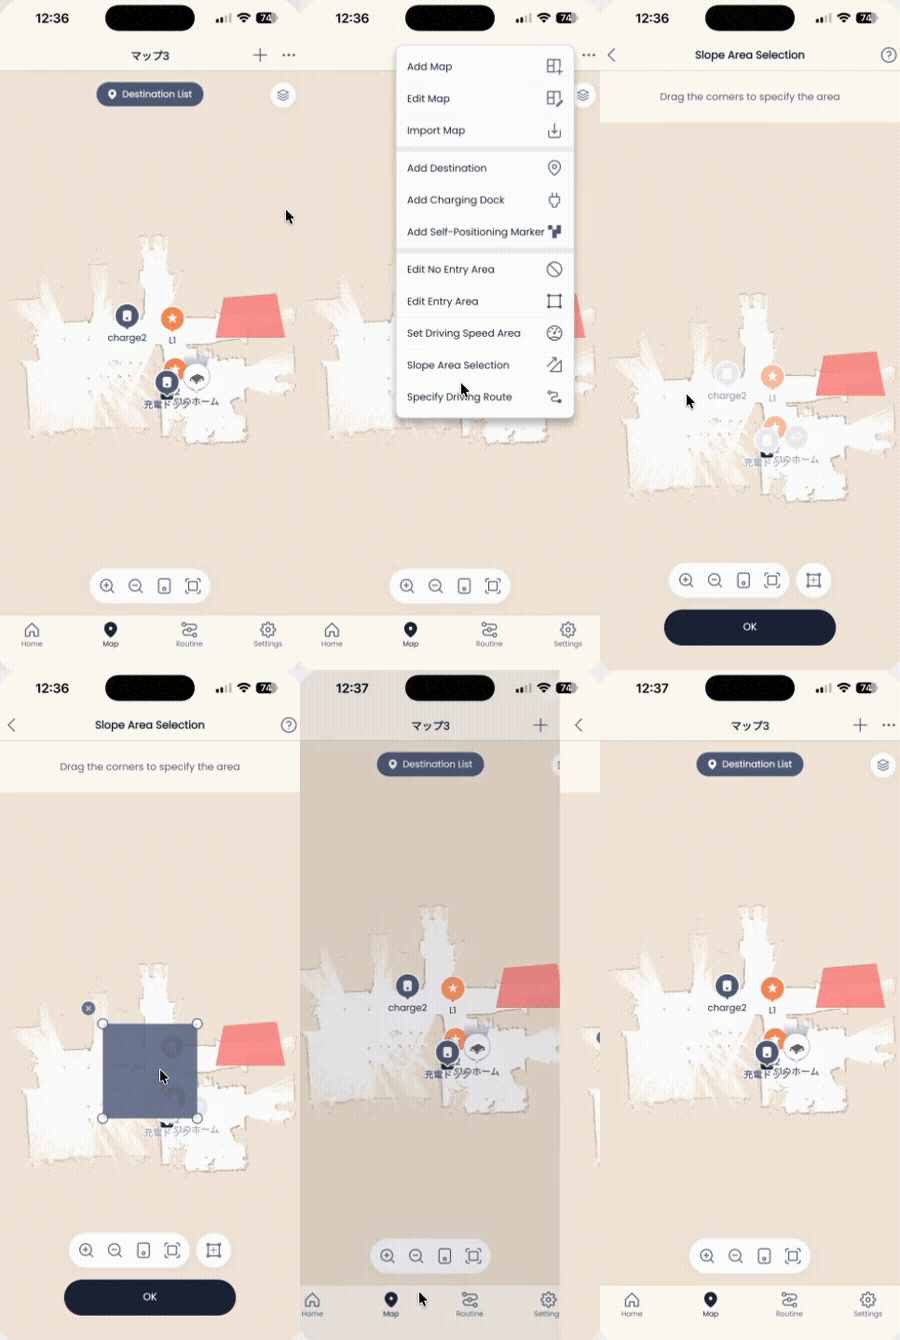
Step 2: Draw the Slope Zone on the Map
Once the map is built, set the slope zone in the app:
- Open the “Map” tab in the app.
- Tap the ”+” icon at the top right of the screen.
- Choose “Slope Zone” from the menu.
- Tap the plus icon at the bottom right to add a zone frame.
- Drag the gray frame so it encloses the entire incline, and also include the flat areas roughly 1.5 m before and after the slope’s entrance and exit. Draw the frame on the long side. The frame’s shape is freely adjustable, so set it to suit the on-site route.
- Tap “OK” to save.
Step 3: Add No-Go Zones and Driving Routes for the Site
Depending on what surrounds the slope, two supporting settings may be needed:
- When the outer edge of the slope has only a low railing: if the slope’s outer edge is bounded only by a low fence, add a no-go zone around the area, excluding the entrance and exit, so the robot does not plan a path that drifts off the side of the slope. This is especially important when the railing appears on the map not as a clear solid line but as a dotted line. If the slope is enclosed by walls on both the left and right, this step is unnecessary.
- To prevent weaving at the top of the slope: to stop the robot from swerving left and right at the top of the slope, set a driving route and via points as needed to fix how the robot travels on the slope.
When You Don’t Need Fine Position Adjustment on Arrival
If the destination at the end of the slope does not need precise alignment, enable skipping arrival position and heading fine-tuning so the robot does not keep correcting its heading on the incline after arriving.
Screens