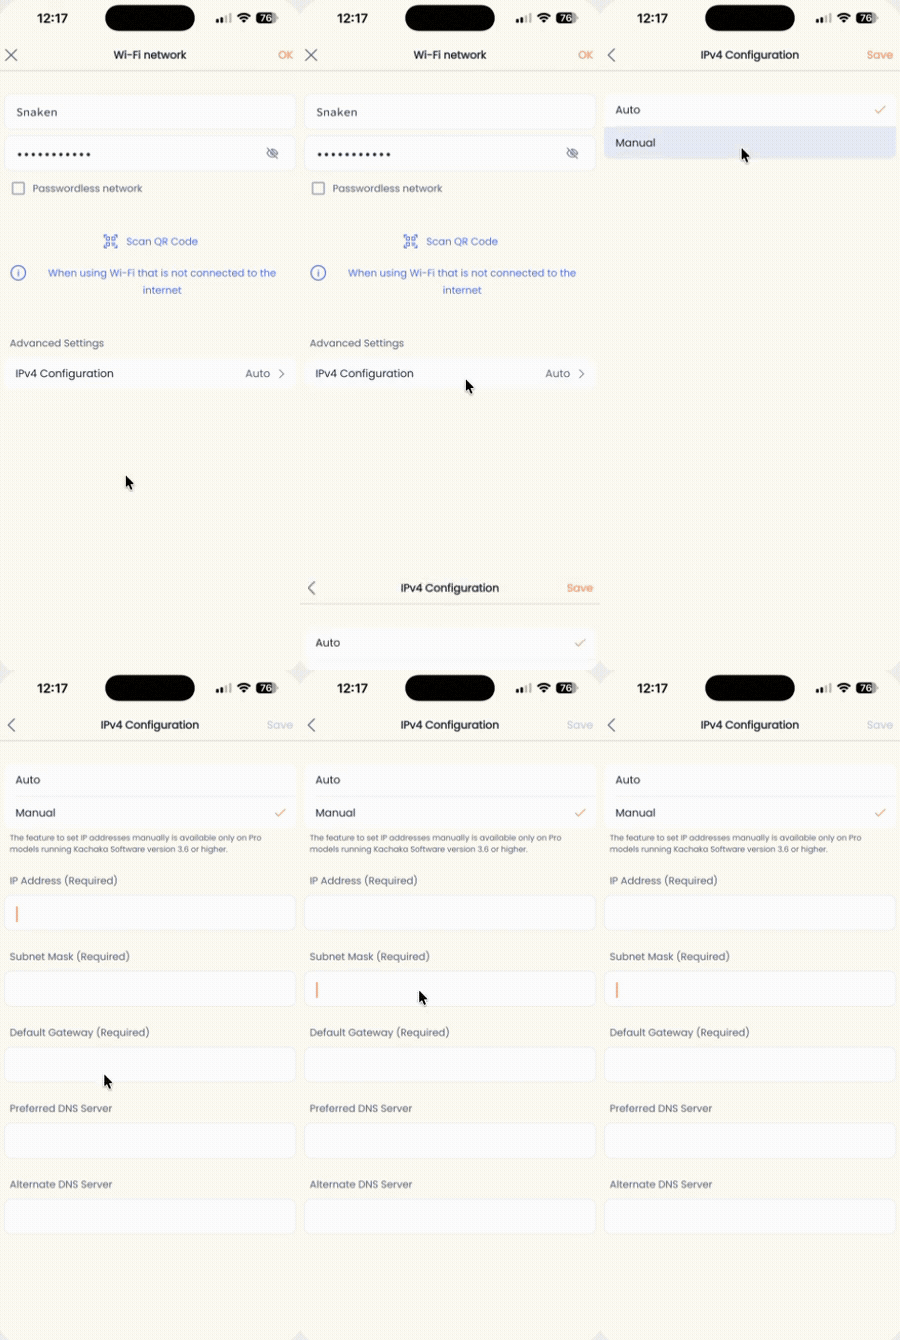
Kachaka Pro: Static IP Address (Manual IPv4)
Kachaka Pro can be set up with a fixed IPv4 address that you assign manually during Wi-Fi setup, instead of letting the router hand one out automatically. This feature is exclusive to Kachaka Pro and is not available on the home model.
When you need a static IP
In a typical home, automatic IP assignment (DHCP) from your router is all you need, and there is no reason to set this manually. Consider a static IP only in these cases:
- A security policy requires it. Your network rules require every connected device to use a fixed IP for control and auditing.
- There is no DHCP server. For example, a standalone access point with no upstream router, or a Wi-Fi device running in AP mode, where nothing on the network hands out IP addresses.
- You hear a DHCP-related error during setup. If Kachaka announces something like “the DHCP server is not responding” while you configure Wi-Fi, that network cannot assign an IP automatically and you need to set one by hand.
Setup steps
A static IP is configured inside the Wi-Fi setup flow. Both first-time setup and later changes use the same entry point; for a robot that has already been set up, use “Reconfigure Wi-Fi.” For the full Wi-Fi setup and reconfiguration flow, see Setting Up and Changing the Wi-Fi Connection.
- Open the Kachaka app and go to the “Settings” tab.
- Under “Kachaka Settings,” tap the Kachaka you want to configure.
- Tap “Reconfigure Wi-Fi” in the center of the screen.
- Tap “Skip” in the top-right corner.
- Under “Advanced Settings,” tap “Configure IPv4.”
- Choose “Manual,” enter the values you want to set, then tap “OK” in the top-right corner.
- Enter the remaining “Wi-Fi Network Name (SSID)” and “Wi-Fi Password,” then tap “OK” in the top-right corner.
- Follow the on-screen guidance to finish the rest of the Wi-Fi setup.
Once this is done, the robot will use the address you assigned whenever it connects to that Wi-Fi network.
Not sure which values to enter?
Manual IPv4 setup needs an IP address, a subnet mask, and a gateway (default gateway). The quickest way to find these is to connect a phone or tablet to the same Wi-Fi network you intend Kachaka to use, then read the values from the phone’s network info:
iPhone / iPad
- Open the “Settings” app and tap “Wi-Fi.”
- Tap the “i” icon next to the name of the network you are connected to.
- The “IPV4 Address” section shows: IP Address, Subnet Mask, and Router (the default gateway).
- Scroll down to the “DNS” section to see the DNS server address currently in use.
Android
- Open the “Settings” app and go to “Network & internet” -> “Wi-Fi.”
- Tap the “i” icon next to the name of the network you are connected to.
- Expand “Advanced” or “IP settings” to see: IP Address, Gateway (the default gateway), and Subnet Mask.
- The subnet mask is sometimes shown as a “prefix length”; for example,
24corresponds to255.255.255.0.
- The subnet mask is sometimes shown as a “prefix length”; for example,
- In the same “Advanced” section, you will find “DNS 1” and “DNS 2” fields, which are the DNS server addresses currently in use.
When you enter Kachaka’s IP address, pick one on the same subnet that will not clash with another device (it is best to avoid the range your router’s DHCP hands out automatically). If you instead need to look up Kachaka’s current IP or MAC, or fix its address another way, see Finding and Fixing IP / MAC Addresses.
If the app still cannot connect after setup, work through Wi-Fi Setup Fails or Cannot Connect After Setup. For an overview of every network architecture Kachaka supports and its connectivity specs, see Network Architecture & Wi-Fi Connectivity Specifications. If you need to operate entirely without an internet connection, on a LAN only, see Kachaka Pro: Offline LAN-Only Control.
Taiwan NCC Certification
This product has obtained Taiwan NCC type approval — Kachaka (home model, model B1T01): CCAM25LP1971T5; Kachaka Pro (model B2T01): CCAM25LP1970T3.
For low-power radio-frequency equipment that has obtained type-approval certification, no company, firm, or user may alter the frequency, increase the power, or change the characteristics or functions of the original design without approval. The use of such equipment must not affect flight safety or interfere with lawful communications; if interference is found, use must cease immediately and may resume only after the interference has been eliminated. Such low-power radio-frequency equipment must accept interference from lawful communications or from industrial, scientific, and medical radio-wave radiating equipment.
Screens