
Setting Up and Changing the Wi-Fi Connection
Both Kachaka and Kachaka Pro rely on the Wi-Fi at your home or site so the app can control them, run schedules, and send notifications. Whenever you change routers, update your Wi-Fi password, or want to move the robot onto a different network, use the “Reconfigure Wi-Fi” flow described here. The whole setup is done from the app, and the robot picks up the new Wi-Fi credentials by scanning a QR code on your phone with its front camera.
If you are doing the initial setup, read this alongside the First-Time Setup walkthrough.
Steps to Reconfigure Wi-Fi
-
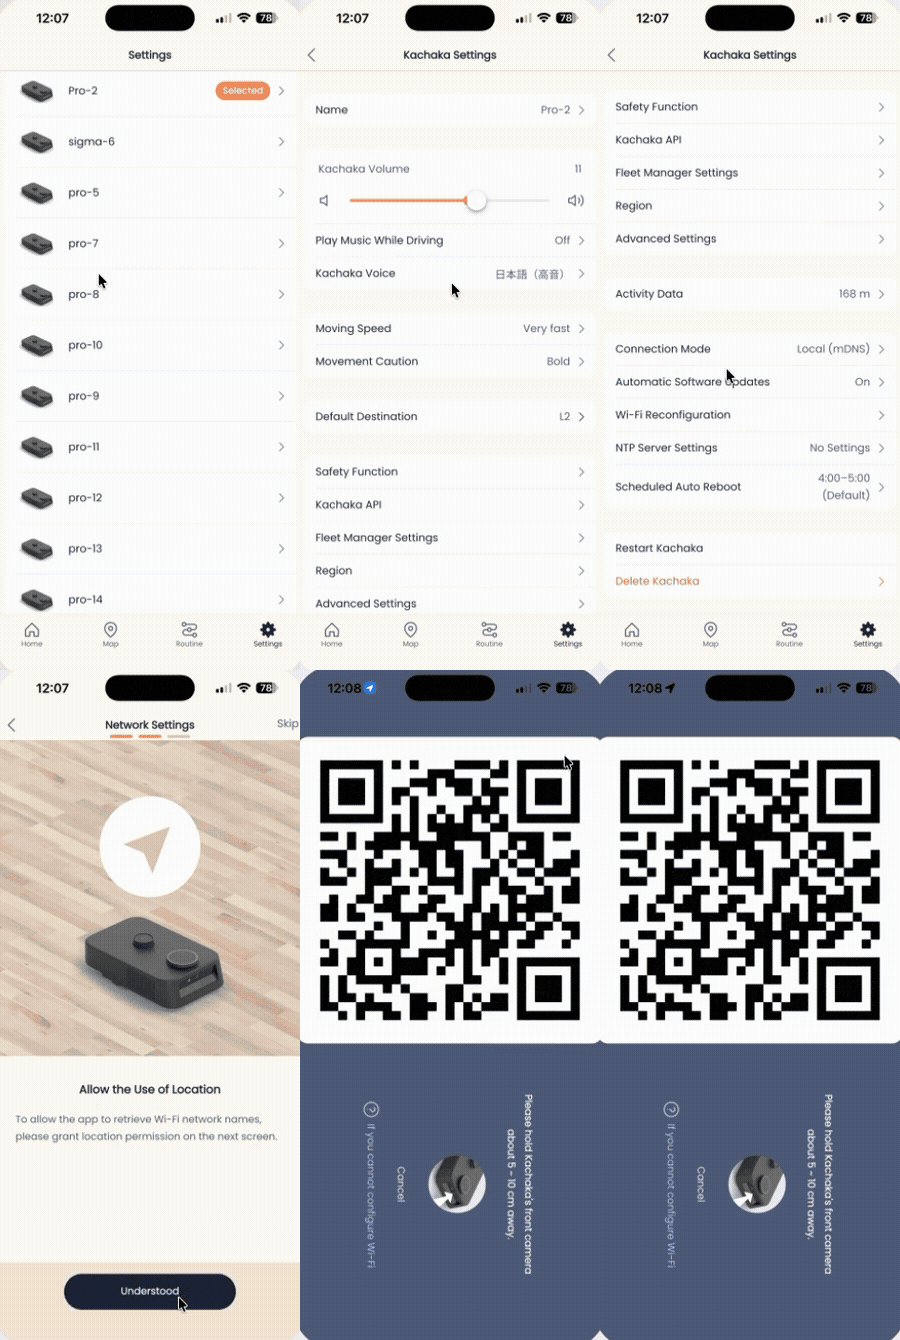
Open the Kachaka app and switch to the “Settings” tab.
-
Under “Kachaka settings,” tap the Kachaka you want to configure.
-
Tap “Reconfigure Wi-Fi” in the center of the screen.
-
Follow the on-screen guidance until the Wi-Fi QR code screen is generated.
-
Now put Kachaka into scanning mode using one of these two methods:
- Start by voice: Say to Kachaka, “ねぇカチャカ、ワイファイの設定”.
- Start by button: Long-press the multi-function button next to the rear camera for about 3 seconds.
-
When Kachaka begins its voice guidance and the front LED starts blinking, it has entered Wi-Fi setup mode and is ready to scan.
-
Following the voice guidance, hold your phone’s QR code up to Kachaka’s front camera, bringing it within about 10 cm so it can read the code. Once the read succeeds, the robot connects to the new Wi-Fi on its own.
During setup, return the robot to its charging dock, turn up your phone’s screen brightness, and show the full QR code to make a clean read on the first try.
When Voice Won’t Start the Scan
If you say “ねぇカチャカ、ワイファイの設定” but the QR code reader does not start, the voice command most likely was not received. Check the following in order:
- Confirm the wording: Say the wake word and command together as “ねぇカチャカ、ワイファイの設定” so Kachaka begins reading.
- Confirm voice recognition is on: If the robot’s voice recognition is disabled, it will not accept any voice command. On Kachaka Pro, see Enable or Disable Voice Recognition to turn it back on.
- Use the multi-function button instead: In environments where voice is impractical (or voice recognition is off), simply long-press the multi-function button next to the rear camera. After a few seconds Kachaka starts its voice guidance and enters QR reading mode, exactly as with the voice trigger.
As soon as Kachaka begins announcing that it is starting Wi-Fi setup, it has entered reading mode — just follow step 7 and aim the QR code at the front camera.
If It Won’t Connect After Setup
If you followed the flow but it shows a connection error, or the QR code won’t read at all, work through these pages:
- Wi-Fi Setup Fails or Cannot Connect After Setup
- Network Architecture & Wi-Fi Connectivity Specifications
- Router Privacy Separator Blocking & Ping Test
Taiwan NCC Certification
This product has obtained Taiwan NCC type approval:
- Kachaka (home model, B1T01): CCAM25LP1971T5
- Kachaka Pro (model B2T01): CCAM25LP1970T3
Low-power radio-frequency device notice: Without prior approval from the NCC, no company, firm, or user may alter the frequency, increase the power, or change the characteristics and functions of the original design of an approved low-power RF device. Its use must not affect flight safety or interfere with lawful communications; if interference is found, the user must immediately stop operating the device and may not resume until the interference is resolved. Such low-power RF devices must accept interference from lawful communications or from industrial, scientific, and medical (ISM) radio-wave radiating equipment.
Screens
Related
- Kachaka Pro: Enable or Disable Voice Recognition
- Wi-Fi Setup Fails or Cannot Connect After Setup
- Network Architecture & Wi-Fi Connectivity Specifications
- First-Time Setup walkthrough