Self-Position Correction with Markers (Kachaka Pro)
Self-position correction markers are a Kachaka Pro only feature. When Kachaka tends to drift in certain spots and gradually loses track of where it is, you can mount dedicated marker sheets at those spots and register them in the app. Whenever Kachaka passes a marker afterward, it automatically corrects its self-position.
This feature is supported on Kachaka Pro only; the home Kachaka does not offer it.
If you are not yet sure what causes drift or what other correction options exist, start with Fixing Position Drift and Getting Lost. Marker correction is best suited to a few fixed “always problematic” locations.
Step 1: Decide Where to Place the Markers
- Identify the spots where Kachaka tends to drift and where you most want correction to happen.
- The following conditions make placement most effective:
- Place the marker along a path where Kachaka can see it clearly, head-on.
- When using several markers, space them roughly 5 m apart.
- Do not place a marker in the middle of an empty corridor. A spot partway down a corridor still works if there are objects there (walls, cabinets, or other recognizable environmental features).
Step 2: Prepare the Markers
- Open the marker files provided by Sigma (
PFR_pEncode_001-020.pdf, plus an alternate designPFR_pEncode_001-020_rectangles.pdf).- Page 1 is the ID=1 marker, page 2 is ID=2, and so on.
- You can also confirm the ID from the “XX” in “Preferred Robotics, Inc. XX” printed at the bottom of each marker.
- If markers are already installed on site, be sure to use a different ID for new ones. Using the same ID in multiple places can make position correction unreliable.
- Set your printer’s scale to 100% and print the required ID page(s) on A4 paper.
- Changing the scale affects Kachaka’s recognition accuracy, so always print at 100%.
Step 3: Mount the Markers
- Correct orientation
- Mount the marker so the side printed with “Preferred Robotics, Inc. XX” faces down.
- The marker will not be recognized correctly if mounted the wrong way up.
- Mount on a wall
- Ideally, the bottom edge of the marker should touch the floor.
- If that is not possible, mount it straight at a height within 14 cm of the floor.
- Make sure the paper does not fold or bow; fix it down flat and firmly.
- Use suitable tape
- White double-sided tape is recommended.
- If double-sided tape is not an option, use white or clear tape and take care not to cover the black areas of the marker.
Step 4: Register in the App
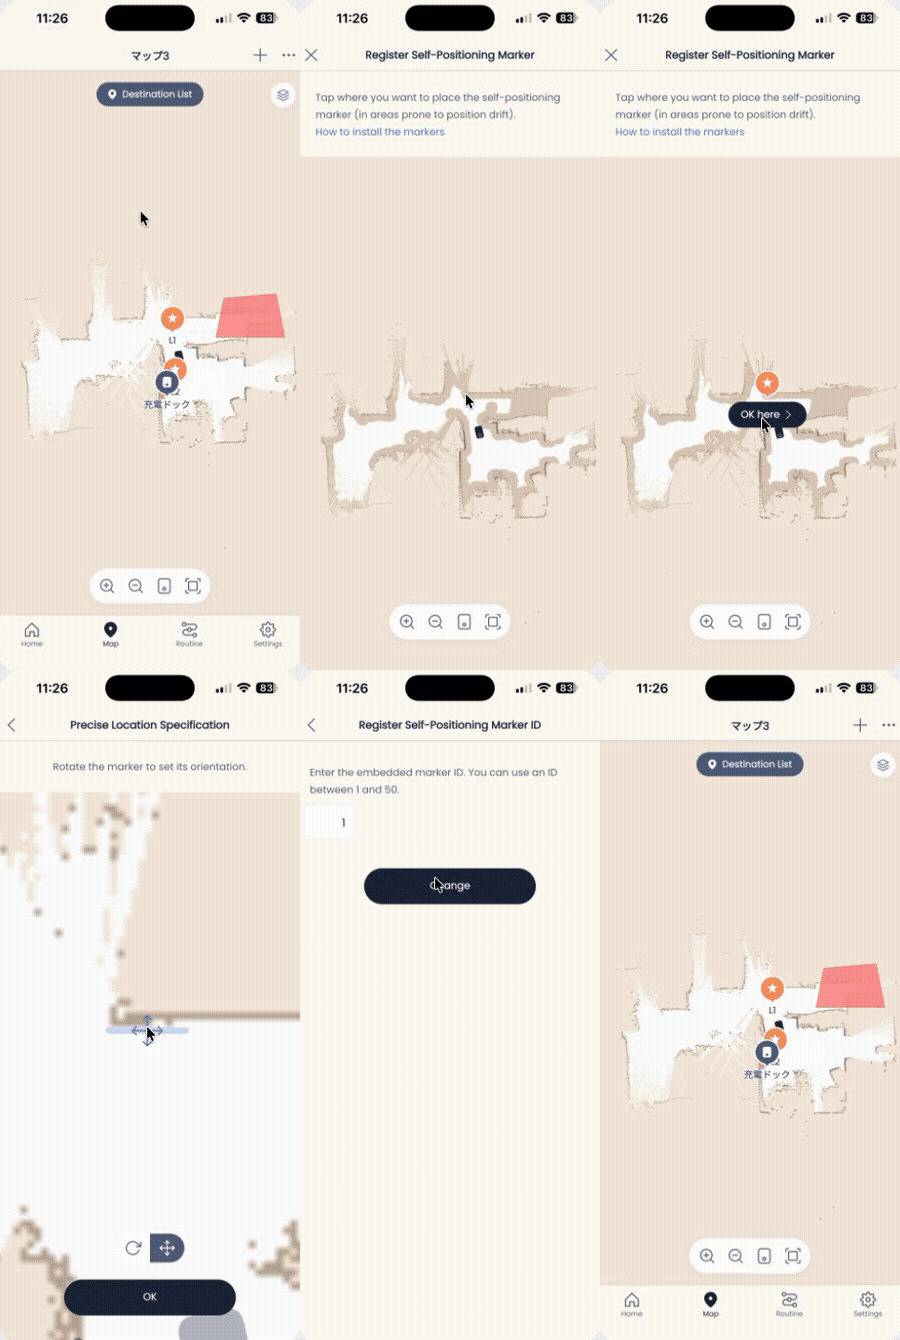
- On the app’s Map tab, tap the ”+” button and select “Add self-position correction marker.”
- Follow the on-screen guide to register, on the map, the location where you actually mounted the marker.
- Register the ID you prepared in Step 2.
Step 5: Final Check
First, verify the marker is mounted correctly:
- Is the orientation right?
- Is the height within range above the floor?
- Are there any folds or bowing in the paper?
- Did you correctly use different IDs?
Then test whether Kachaka actually recognizes the marker:
- For testing, temporarily turn off auto-return to the charging dock (remember to restore your original setting afterward). See Set the Auto-Return-to-Dock Timer.
- Short-press the power button to put Kachaka into a stopped state (the LED turns yellow) so it does not drive off on its own. See Stopping and Pause Mode.
- Lift Kachaka up (deliberately throwing off its self-position) and set it down near the marker.
- Short-press the power button again to release the yellow pause state (the LED turns white).
- Drive Kachaka so it can see the marker, and confirm that position correction kicks in. You can use Manual Remote Control to move it.
- Note: Kachaka does not perform position correction while standing still; it must see the marker while moving for correction to trigger.
When Recognition Isn’t Working
- First go back and fix how the marker is mounted (orientation, height, flatness, ID).
- When Kachaka detects a marker while moving, the closer the marker and its surroundings match the composition from when the map was built, the easier it is to recognize. If a corridor was only driven through once in a single direction during mapping, leaving the map imprecise, correction will be hard to trigger. In that case, see Map Prep and Accuracy Tips, and consider Updating an Existing Map or Creating a New Map.
To obtain the marker files, please contact Sigma.
Screens